Cell–Cell Communication
On this page, you will find information about how to run cell–cell communication analysis in iSCanGuide.
iSCanGuide identifies which cell types are sending signals to which other cell types, and through which ligand–receptor pairs. For example, in a thymus sample it can determine whether immune cells signal to stromal cells through the IL1A → IL1R1 axis, and rank that signal against all other possible signals. For spatial samples (e.g., Visium, Xenium, MERFISH), it additionally shows where in the tissue that signaling is happening.
Under the hood the analysis combines several published scoring methods and aggregates their ranks into a consensus result.
When to use it
You want to know which cell types are communicating with which other cell types.
You want a ranked list of the strongest ligand–receptor interactions.
(Spatial samples) You want to see where signaling occurs in the tissue and which signals are spatially organised vs. diffuse.
Before you start
The analysis requires a sample with cell type labels already assigned — either from a sample metadata column or from a saved Cell Annotation. The sample type should be Spatial if you want the Spatial Co-expression and Inflow tabs; non-spatial samples produce only the Cell Type Pairs and Interactions tabs.
Navigation
To access the Cell–Cell Communication panel, click on the Cell-Cell Communication tab in the Data and Analysis Panel at the bottom of the Analysis page.
Workflow
New Analysis
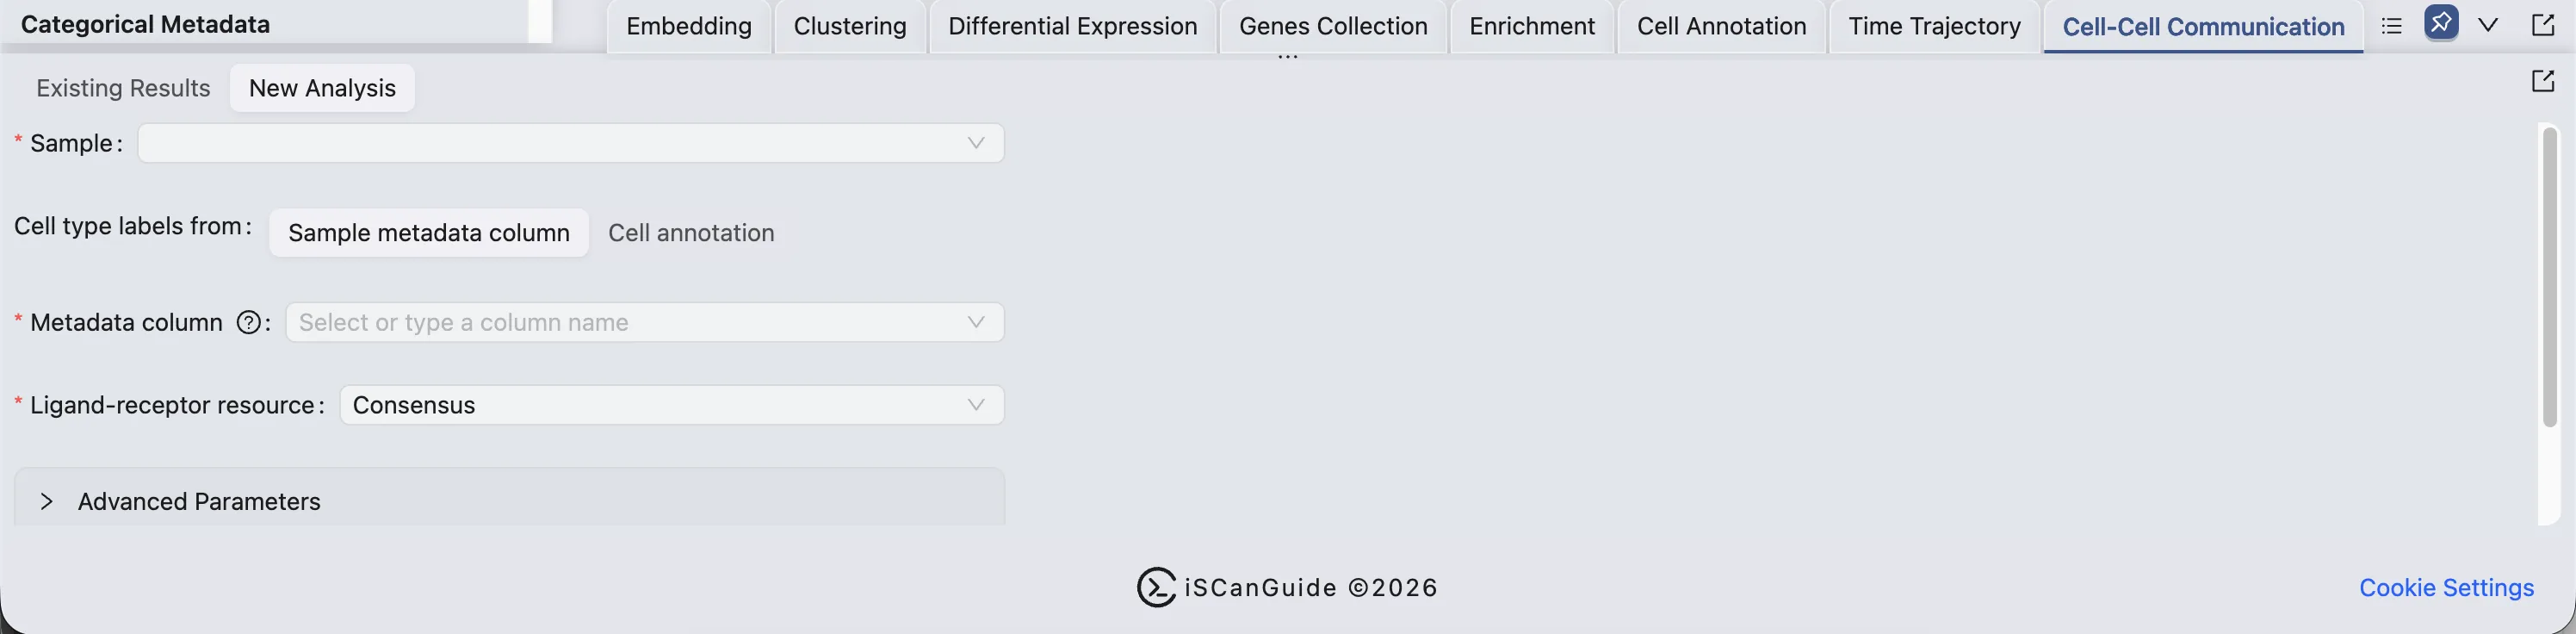
The Cell-Cell Communication panel has two tabs: Existing Results and New Analysis.
Click the New Analysis tab to configure a run.
Form fields
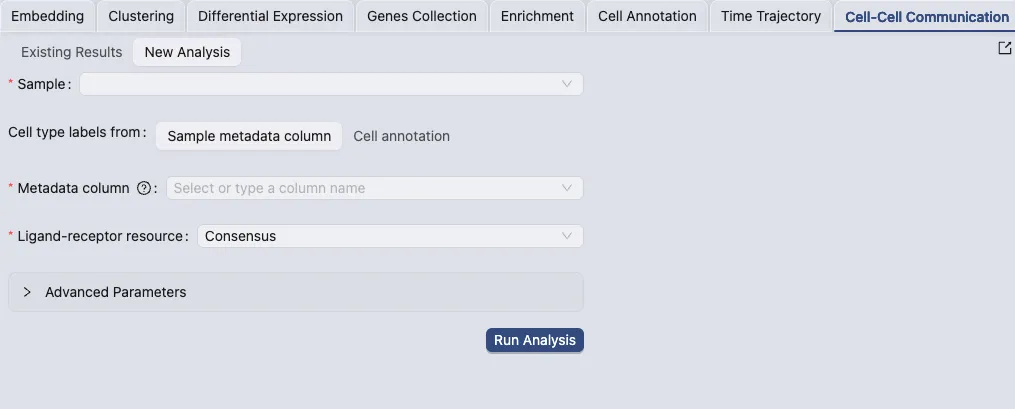
Mandatory fields are marked with a red asterisk.
Sample (required): The processed sample to analyze. Only pre-processed samples appear in the list. One sample per run.
Cell type labels from (required): Where your cell type assignments live.
Sample metadata— labels come from a column in the sample's cell metadata (the AnnDataobstable). Use this if your cell types were imported with the sample (e.g., acell_typecolumn).Cell Annotation— labels come from an annotation saved in iSCanGuide (e.g., output from a SingleR run or manual annotation). Picking the right source matters: bad labels produce weak or uninterpretable results.
Cell Annotation or Metadata column (required): The specific annotation or column that holds the labels.
Ligand-receptor resource: The catalogue of known ligand–receptor pairs to score against. Default:
Consensus.
Ligand-receptor resources
Resource | Notes |
|---|---|
Consensus | Union of several public databases. Default for most analyses. |
Mouse Consensus | Use for mouse samples. |
CellCall | Specialty database. |
CellChatDB | Use to compare to a CellChat-based publication. |
CellPhoneDB | Use to compare to a CellPhoneDB-based publication. |
CellTalkDB | Specialty database. |
ConnectomeDB 2020 | Specialty database. |
EMBRACE | Specialty database. |
ICELLNET | Specialty database. |
LRDB | Specialty database. |
Ramilowski 2015 | Specialty database. |
Advanced Parameters
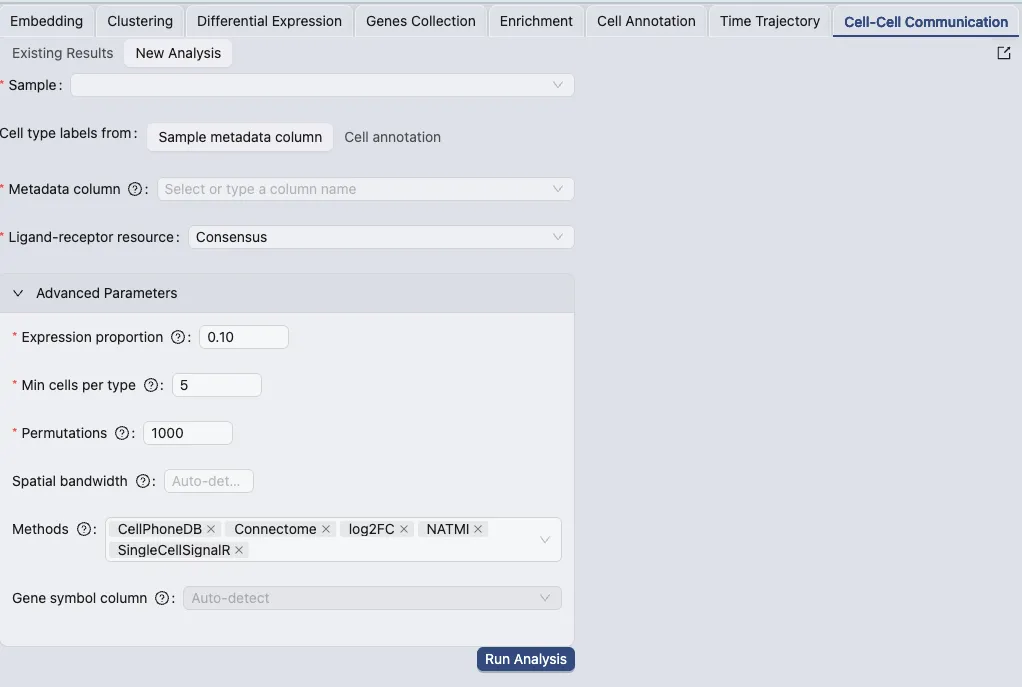
Click the > button next to Advanced Parameters to expand. Most users can leave all of these at their defaults.
Expression proportion (default
0.10): Minimum fraction of cells in a given cell type that must express a gene for it to count as "expressed" in that type. A ligand or receptor falling below this threshold is dropped for that cell type, so the L–R pair is not scored for it.Raise (e.g.
0.25) to be stricter and reduce noise.Lower (e.g.
0.05) for rare cell populations or sparse data.
Min cells per type (default
5): Cell types with fewer cells than this are excluded entirely. Protects against unstable scores driven by only a handful of cells.Raise (e.g.
20–50) if you want to ignore very small clusters that may be doublets or noise.
Permutations (default
1000): Number of random shuffles used to compute non-spatial p-values. More permutations gives more precise p-values at the cost of run time. Default 1000 is fine for most analyses. This setting is used only for non-spatial samples; liana uses a different approach for spatial data and ignores this value.Spatial bandwidth (default
Auto-detect, spatial samples only): Size of the spatial neighbourhood (Gaussian kernel) used for Moran's I and the Inflow score, in coordinate units. Leave onAuto-detectunless you have a specific reason to override it — the tool picks a sensible value from the median nearest-neighbour distance in your sample.Smaller values highlight fine-grained local signals; larger values capture broader gradients.
Methods (default: all five): The individual scoring methods combined into the consensus rank. Keep all five for the most robust result. Available methods:
Method | What it scores |
|---|---|
CellPhoneDB | Mean expression of cognate L–R partners; permutation-based specificity |
Connectome | Weighted product of scaled ligand and receptor expression |
log2FC | Fold-change of ligand/receptor in sender vs. receiver populations |
NATMI | Edge weights from expression product, specificity from contribution to global network |
SingleCellSignalR | LRscore (regularised geometric mean) |
Geometric Mean | Geometric mean of ligand and receptor expression |
scSeqComm | scSeqComm score |
CellChat | CellChat score |
Submitting
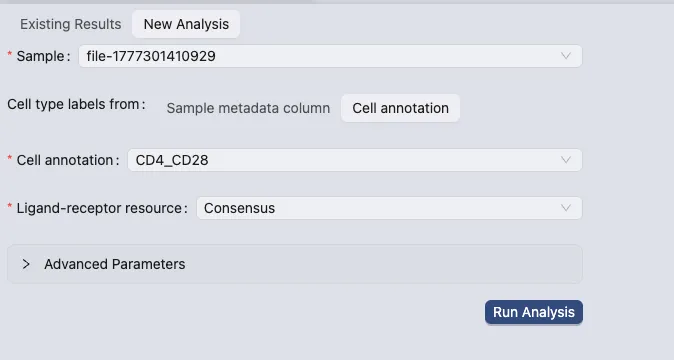
Click the Run Analysis button. The job runs in the background; when it finishes it appears under Existing Results. Visit Study Logs to monitor job progress.
Existing Results

All completed analyses for the current study are listed in the Existing Results tab. Each row shows:
Sample: The sample that was analyzed.
Label source: Where the cell type labels came from.
Resource: The ligand-receptor database used.
Spatial: Whether the sample is spatial.
# Cell types: Number of cell types included.
# Interactions: Total number of inferred ligand–receptor interactions.
Created: Timestamp.
Click the + button on a row to expand it and view the analysis parameters.
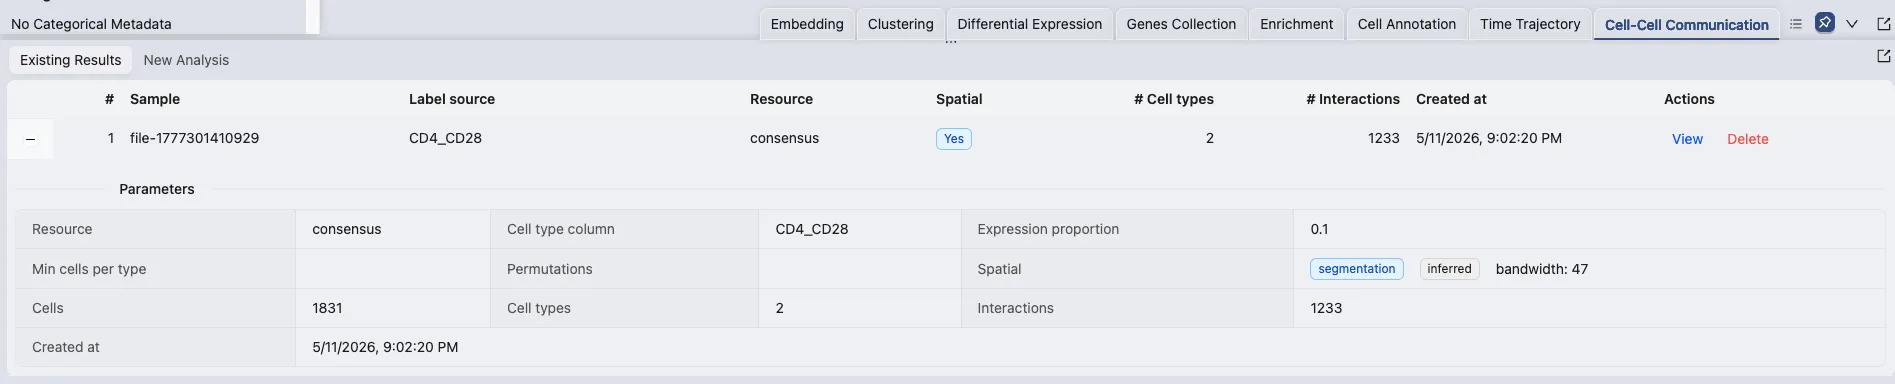
Click View in the Actions column to open the results. Click Delete to remove the analysis.
CCC Results
The results page shows a summary at the top: Sample, Type, Resource, # Cell Types, # Interactions, # Cells, Methods. Results are organised across up to four tabs depending on the sample type.
Cell Type Pairs tab
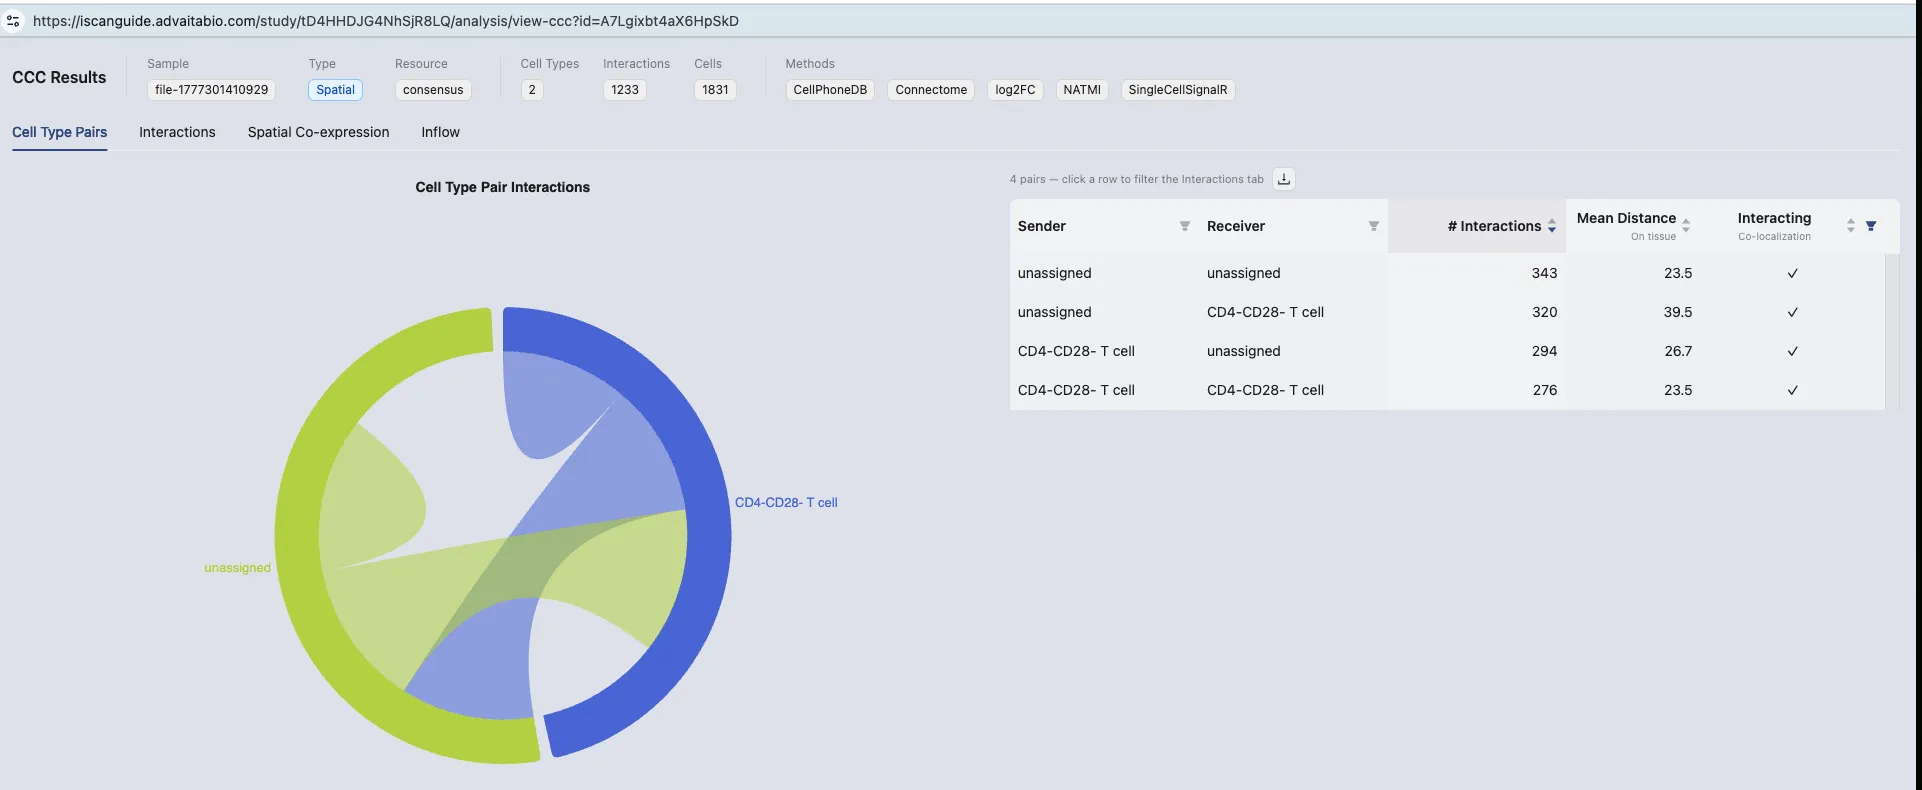
This tab gives a macro view of cell–cell communication.
Chord diagram: A bipartite diagram with ribbons connecting sender and receiver cell types. Hovering over a ribbon shows the number of interactions, mean distance, and interacting status.
Table (right side): Every directed sender → receiver pair with:
# Interactions: Number of significant L–R pairs for this sender → receiver direction.
Mean Distance (spatial samples only): Average on-tissue distance between the two populations.
Interacting: Whether the two populations are co-localised on tissue (spatial samples only).
Click a row in the table to jump to the Interactions tab with that sender → receiver pair pre-selected.
Exporting
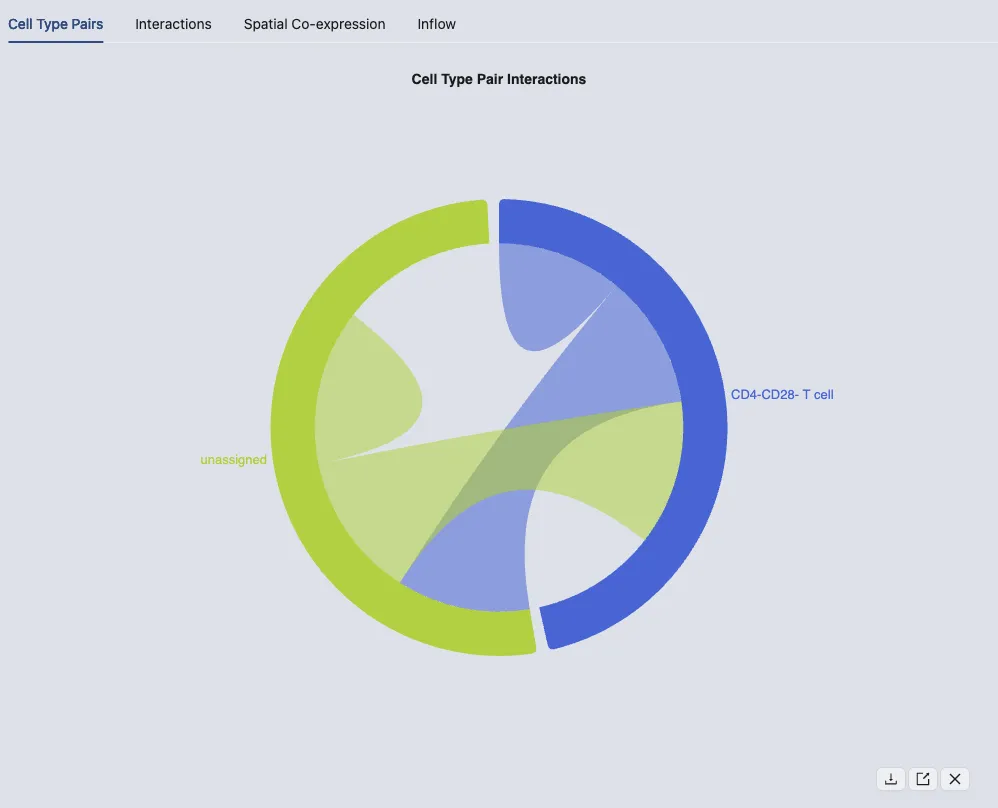
Hover over the chord diagram to reveal export options. Click the export button to download the chart at multiple resolutions.
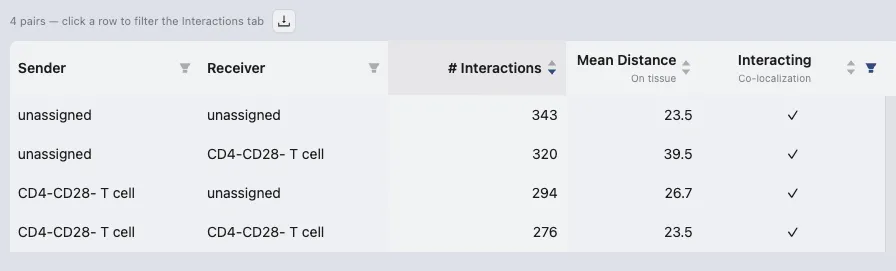
Click the export button above the table to download the results as a CSV.
Interactions tab
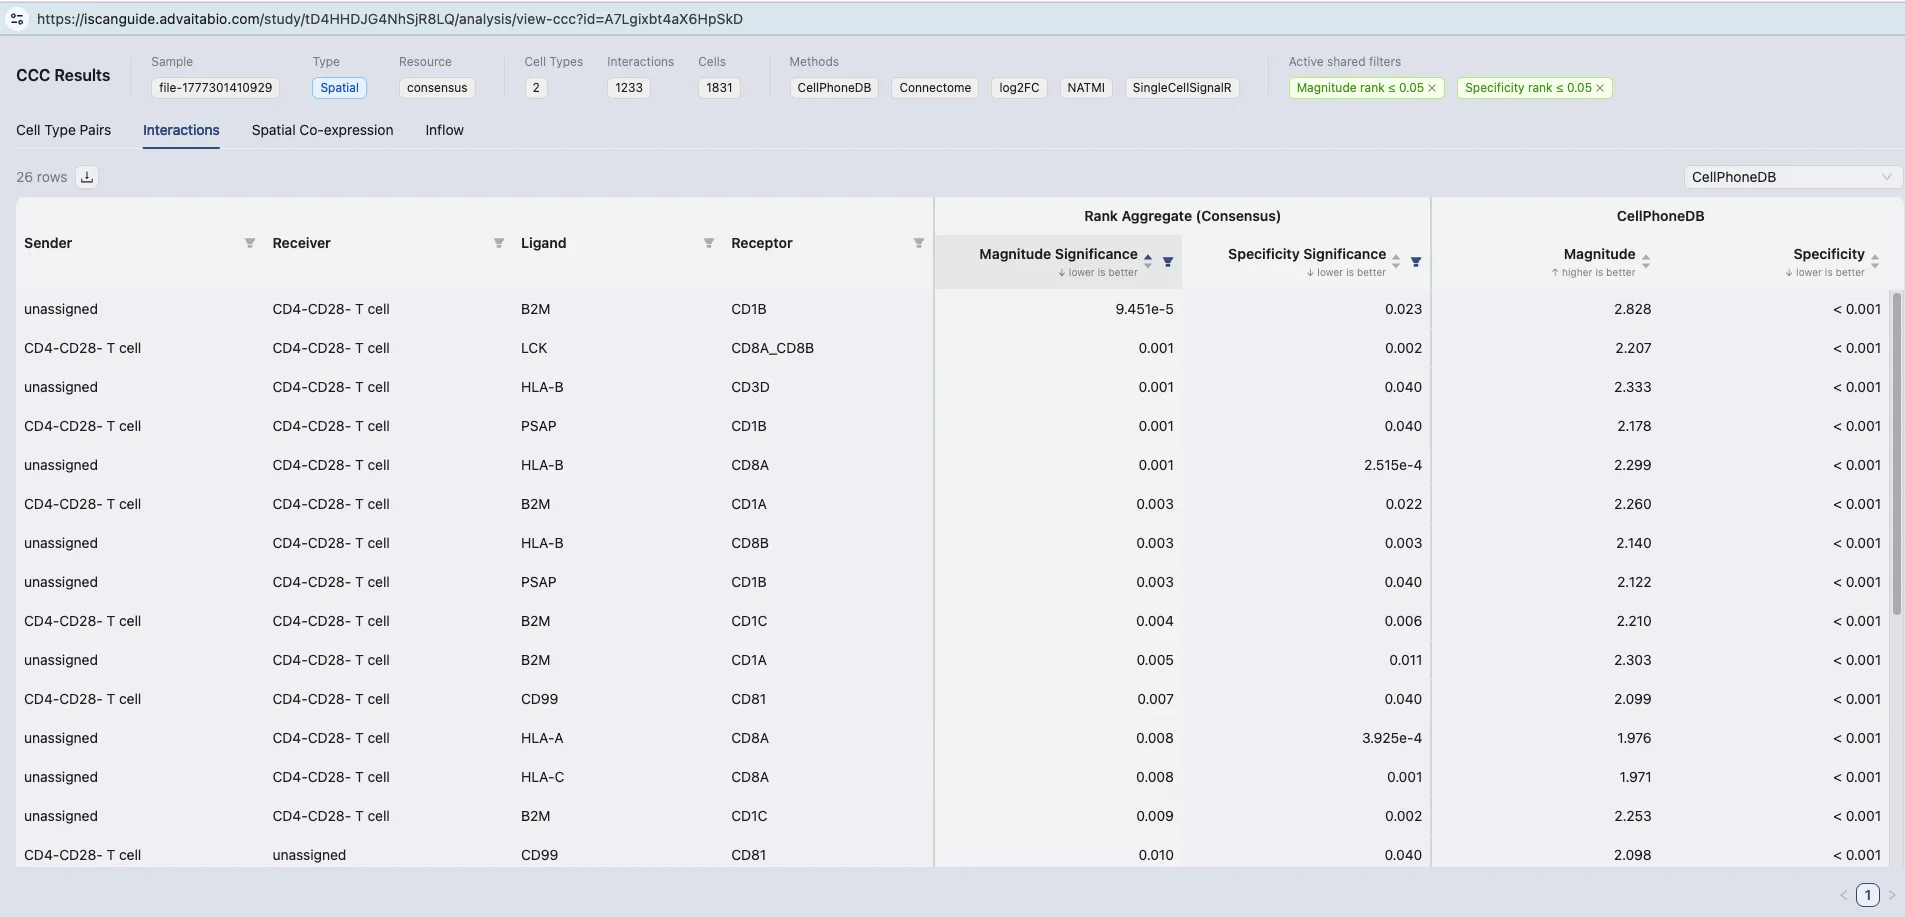
This tab shows the full ranked list of ligand–receptor pairs. Use it to find the strongest, most specific signals.
Key columns:
Sender/Receiver: The cell types on each end of the interaction.
Ligand/Receptor: The gene complexes forming the pair.
Magnitude/Magnitude rank: Expression-based signal strength. Higher magnitude = stronger signal; lower rank = stronger relative to all pairs.
Specificity/Specificity rank: Permutation-based p-value for this pair in this sender → receiver context. Lower rank = more specific.
Filtering:
Use the column filter icons on Sender, Receiver, Ligand, or Receptor to focus on a specific axis.
Adjust the shared filters at the top: Magnitude rank ≤ 0.05 and Specificity rank ≤ 0.05 are the defaults. Relax to ≤ 0.1 if the table is empty.
Select a method from the dropdown on the right to view scores from a specific method (
CellPhoneDB,Connectome,log2FC,NATMI,SingleCellSignalR, orRank Aggregate Consensus). Rank Aggregate Consensus is the default and the most conservative.Sort by Magnitude Significance (lower = more credible) or Magnitude (higher = stronger signal).
Click the export button to download the table as a CSV.
Spatial Co-expression tab
Only available for spatial samples.
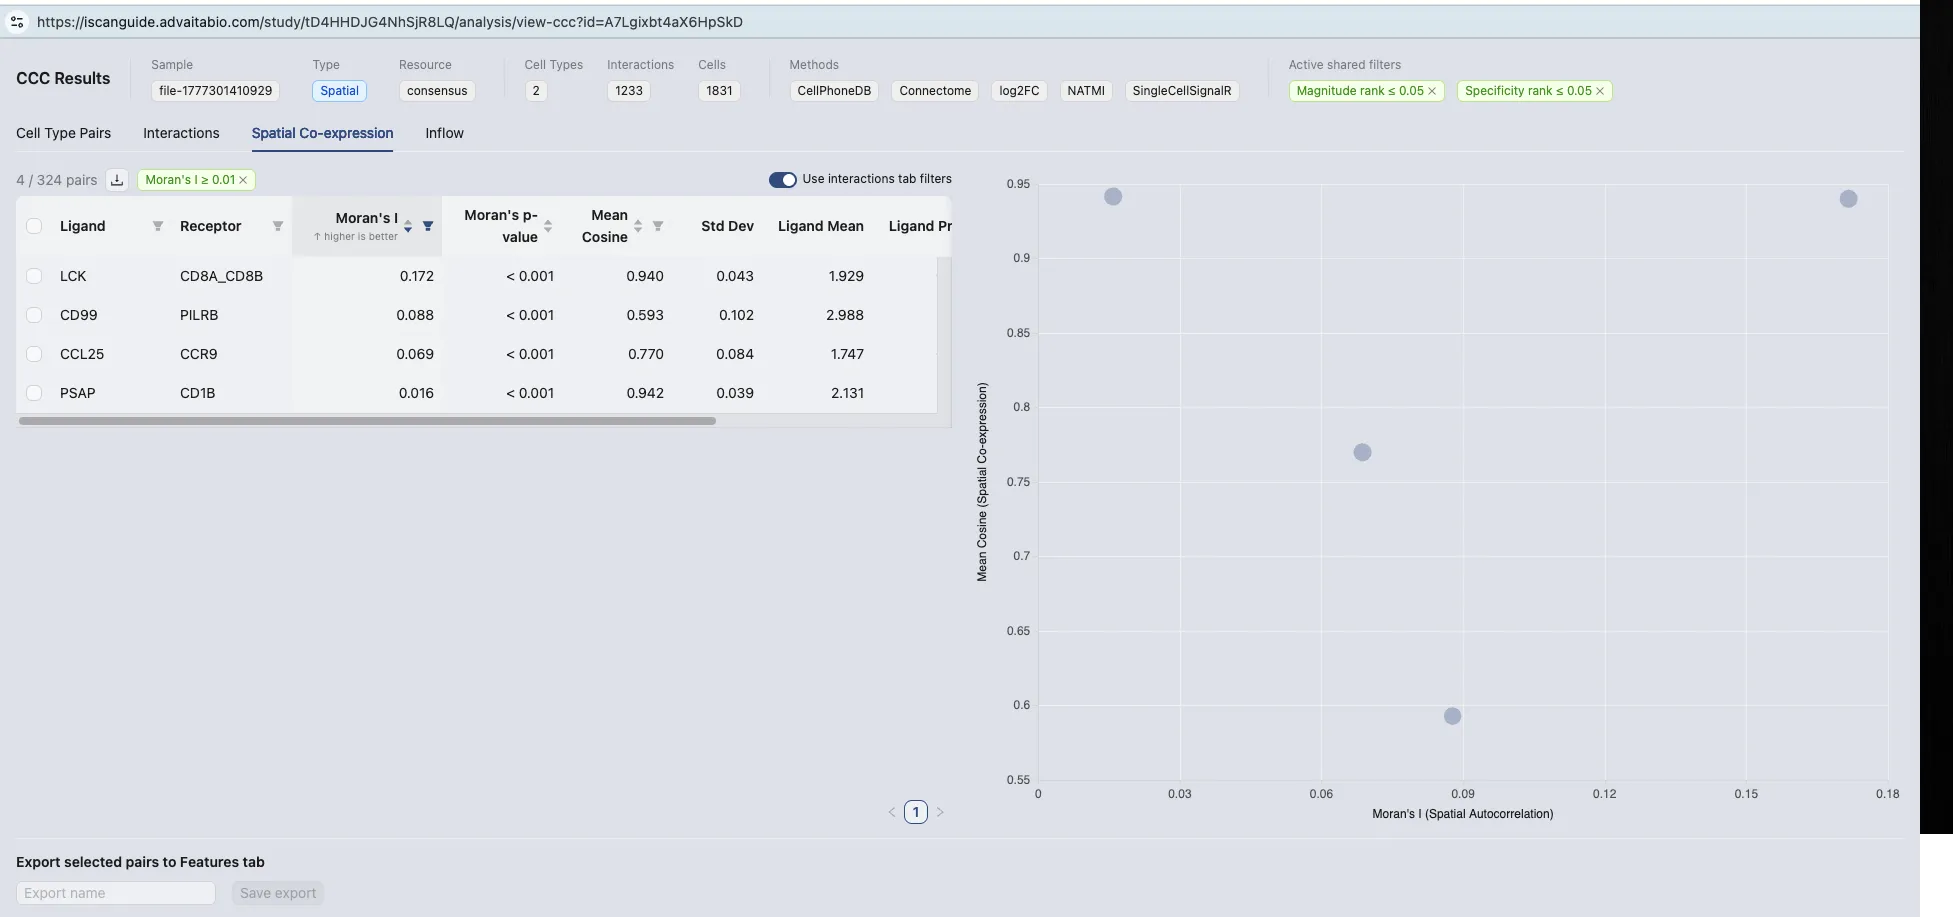
This tab evaluates which of the significant ligand–receptor pairs are actually co-located on tissue.
Columns:
Moran's I: Spatial autocorrelation of the ligand × receptor expression product. Higher = more spatially clustered. Default filter:
Moran's I ≥ 0.01.Moran's p-value: Permutation p-value for Moran's I.
Mean Cosine: Cosine similarity between ligand and receptor expression patterns in neighbouring spots. Higher = more similar spatial patterns.
Std Dev: Standard deviation of the cosine similarity.
The scatter plot on the right plots Moran's I (x-axis) vs. Mean Cosine (y-axis). Pairs in the top-right corner are both strongly spatially clustered and well co-expressed.
Enable Use interactions tab filters to chain the rank filters from the Interactions tab — recommended so you only see pairs that are both statistically significant and spatially co-expressed.
Export to Features
Select rows using the checkboxes, enter a name, and click Save export to push the pairs to the Features explorer in the left panel. Each exported pair becomes a per-cell feature with value equal to the cosine similarity score for that ligand–receptor pair at each cell. Feature label format: ligand^receptor (e.g., IL1A^IL1R1).
Inflow tab
Only available for spatial samples where at least one L–R pair has Moran's I > 0.01.
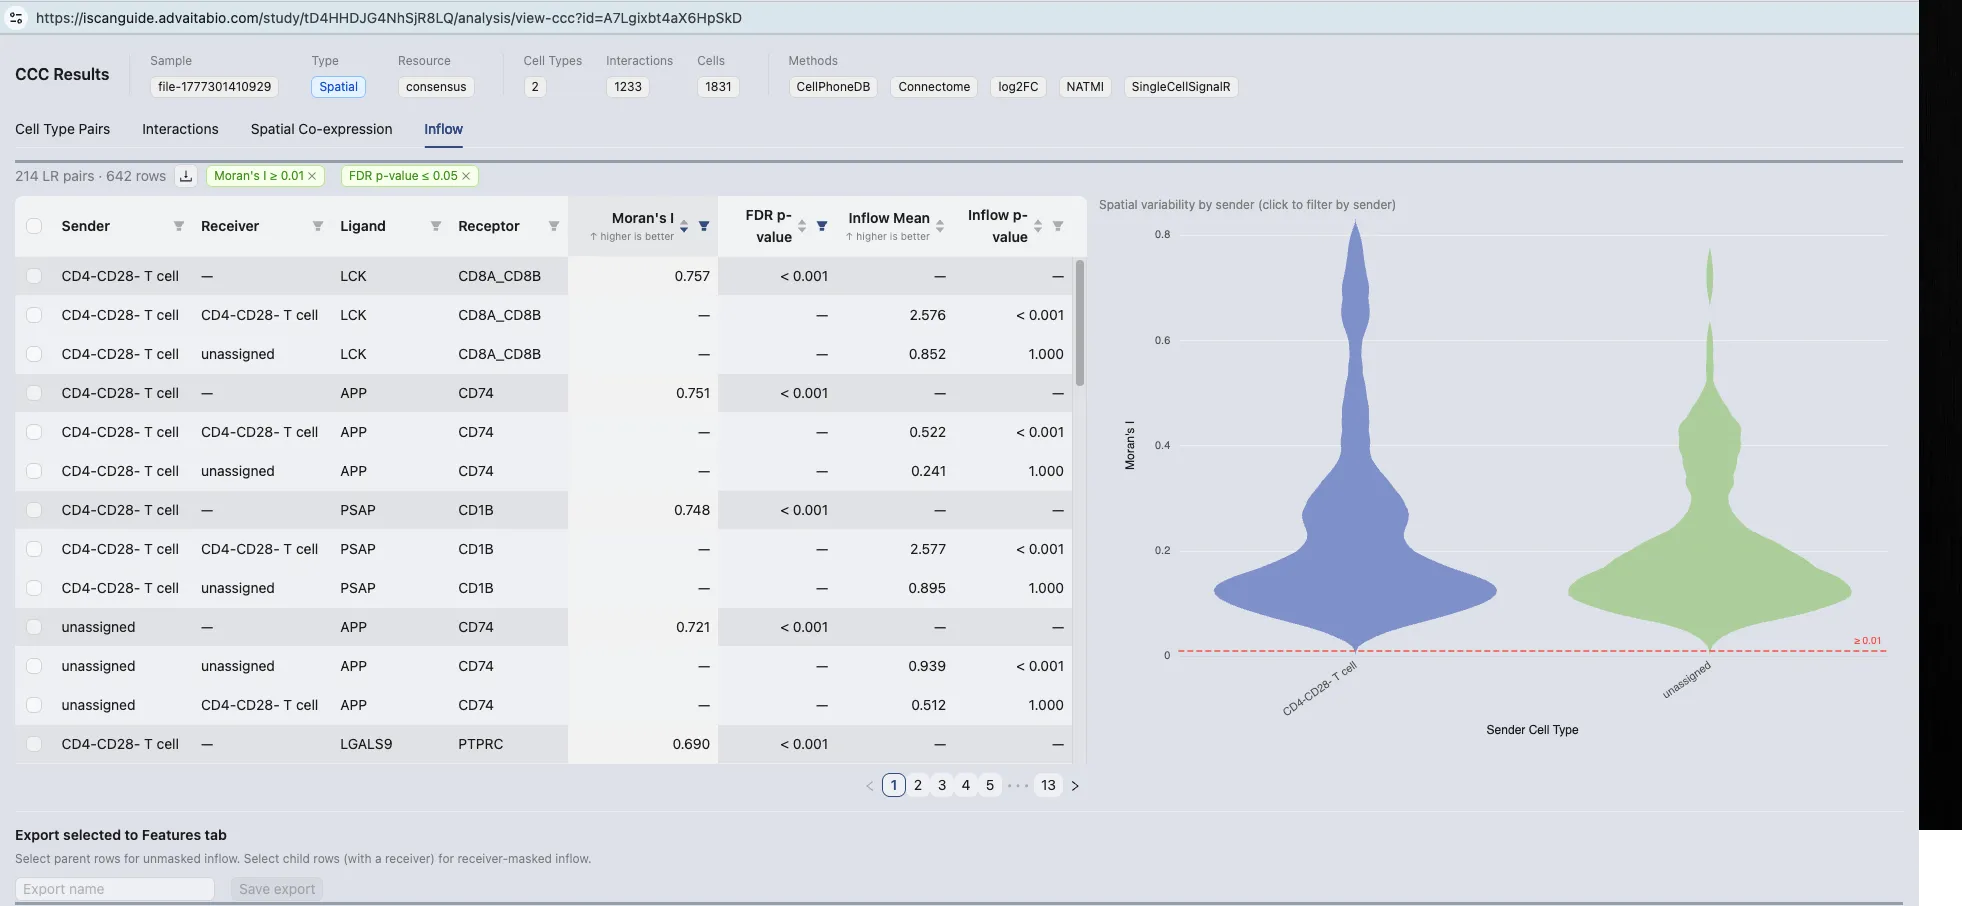
This tab quantifies how much signalling each receiver cell type receives from each ligand–receptor pair, accounting for spatial structure.
The table is hierarchical:
Parent rows (sender + L–R pair): Spatial autocorrelation stats for each inflow column (Moran's I and FDR-corrected p-value).
Child rows (sender + L–R pair + specific receiver): The inflow magnitude (Inflow Mean) and significance (Inflow p-value) broken down by receiver cell type.
Default filters: Moran's I ≥ 0.01 and FDR p-value ≤ 0.05.
The violin plot on the right shows the distribution of Moran's I per sender — the dashed line marks α = 0.01. Use it to compare how spatially organised each sender's output is.
The violin plot is interactive:
Click a sender in the violin plot to filter the view to that sender's L–R pairs and switch the chart to a bar plot ranking those pairs by Moran's I.
Click a bar in the bar plot to select and highlight the corresponding row in the table on the left.
Export to Features
Select rows using the checkboxes, enter a name, and click Save export to push pairs to the Features explorer. Two row types can be exported:
Parent row (unmasked): per-cell value is the inflow score for that sender–ligand–receptor axis across all receiver cells. Label format:
Sender: ligand^receptor(e.g.,Immune: IL1A^IL1R1).Child row (receiver-masked): same inflow score scoped to a specific receiver cell type. Label format:
Sender: ligand^receptor → ReceiverCellType(e.g.,Immune: IL1A^IL1R1 → Fibroblast).
Visualising a pair on tissue
From the Spatial Co-expression or Inflow tab, select the rows you want and Save export to the Features tab.
Close the results panel. The exported feature (e.g.,
LCK^CD8A_CD8B) appears in the left panel under Cell-Cell Communication.Click the
 button next to the feature to add it to the plot grid.
Use Side by Side blend mode to keep cluster, annotation, and L–R co-expression panels in the same coordinate system.
Quick reference
Column | What it means |
|---|---|
# Interactions | Count of significant L–R pairs for a sender → receiver direction. |
Mean Distance | Average on-tissue distance between the sender and receiver populations. |
Magnitude | Score from the chosen method; higher = stronger inferred signal. |
Specificity | Permutation p-value; lower = more specific to this pair. |
Magnitude rank / Specificity rank | Per-method ranks normalised to [0, 1]; used by the consensus aggregator. |
Moran's I | Spatial autocorrelation of ligand × receptor (or of the inflow score). Higher = more spatially clustered. |
FDR p-value | Multiple-testing-corrected p-value for spatial tests. |
Mean Cosine | Cosine similarity of ligand and receptor patterns in a spatial neighbourhood. |
Inflow Mean / Inflow p-value | Magnitude and significance of incoming signal at the receiver. |
Troubleshooting
No Spatial Co-expression or Inflow tabs — the sample is not flagged Spatial. Re-import as Spatial.
Empty Interactions table or very few interactions — relax the rank filters (e.g. ≤ 0.1) or select a single method instead of the consensus. If that doesn't help, the sample's genes may not be using HGNC symbols — all L–R resources use gene symbols (e.g.
IL1A,CD8A), not Ensembl IDs or other identifiers. Check theFeature ID Columnsetting used when the sample was originally imported under Data Management; if it was set to an Ensembl ID column, re-import the sample with the correct symbol column selected."No cell types pass the threshold" — either your labels are too granular (each "type" has only a few cells) or
Min cells per typeis too high. Lower the threshold or re-annotate.Inflow tab missing on a spatial sample — no L–R pair had Moran's I above 0.01, meaning no signal is spatially clustered enough to warrant per-cell inflow computation. This reflects the biology — signals are diffuse.
Most signal in an "unassigned" bucket — your annotation is too coarse. Re-run against a finer label source.
Spatial bandwidth warning — switch from
Auto-detectto a manual value (usually 1–3 spot radii for Visium).Long run times on a very large sample — lower the permutation count, or run on a subset of cell types first.